
Wordpress is the most popular Content management system. The best thing is even a non technical guy can setup a professional looking wordpress website within minutes.
You do not need the knowledge of coding or any other programming knowledge to make a Wordpress website. Most of the web hosting providers offer one click installation of Wordpress which makes thing much more easier.
Moreover, thousands of help tutorials and guides related to Wordpress are available at the Internet. Hence even if you stuck somewhere there is nothing to worry.
Today, In this post we will discuss How you can make your own Wordpress website within minutes.
So Let us start the discussion:-
Requirements: Things you need to make a Wordpress website
There are two necessary things which are needed in order to build a website:-
- Web Hosting
- Domain Name
No matter you are creating your website at Wordpress or at any other platform, these two things are always needed.
Basically when you buy a web hosting (or a web server) you actually rent our a computer which stores your website's files.
See, when you create a website, you need a host computer where you can save files of your website and when someone will visit your website, all the media and files are transferred to that person from this host computer only.
Many people ask that Can I use my own computer as a host computer? 😕😕
The answer is Yes, You can, But these host computers remains switched on throughout the day and remain connected to Internet. This makes your website accessible to people the whole day.
If you will use your own computer as a host computer it is not going to be possible for you to keep it switched on throughout the whole day
Hence, its a better idea you buy web hosting. There are many type of web hosting available like Cloud hosting, VPS hosting, Shared Hosting, Dedicated Hosting.
I personally recommend you to make the use of Cloud hosting. In cloud hosting, you pay for only those resources you use. It is bit costly and difficult to manage for non-techies.
But there are companies like Cloudways which offers managed Cloud servers which are useful for non-technical guys and newbies.
Hence if you are planning to make a website or a Blog, Cloudways is surely the best web host for you.
There are some free hosting providers also available where you can make a wordpress website. 000webhost is one of those free web host.
But making use of these free web hosting services is not recommended. This is because they offer limited resources and your website will remain down for some time daily.
Even you will not be able to login to your web hosting account and your website because they lock the access to your website for particular time daily which makes them useless.
If you think Cloudways is something expensive for you, Namecheap is the second best choice when it comes to web hosting.
So its better to buy a hosting service if you want to make a Wordpress based website.
Apart from web hosting, you need a Domain name. Domain name acts like address of your website.
For e.g. If someone wants to access your website, he or she will need to add your Domain name in his browser's address bar in order to open your website.
You can buy a Domain name from service provider like Namesilo.
(Do not forget to checkout this guide before registering a Domain Name >> Domain Name Registration: Everything you should know)
It is always a better practice to buy Domain Name and Hosting from different providers.
Once, you buy a web hosting and a Domain name you can follow the below given steps to make your own Wordpress website.
(Use the coupon code: BLOGSURGEON while doing signup at Cloudways to avail special discounts)
Steps: Procedure you need to Follow to make a Wordpress website
Once you successfully buy a web hosting and register a Domain name you can start building your own Wordpress based website.
 |
| How to make a Wordpress Blog:- Step By Step Guide |
Here Below are the steps you need to follow to make a Wordpress website:-
(We will be showing you steps with reference to Cloudways. The great thing is these steps remain similar for majority of Hosting providers and can be followed with other hosting services as well)
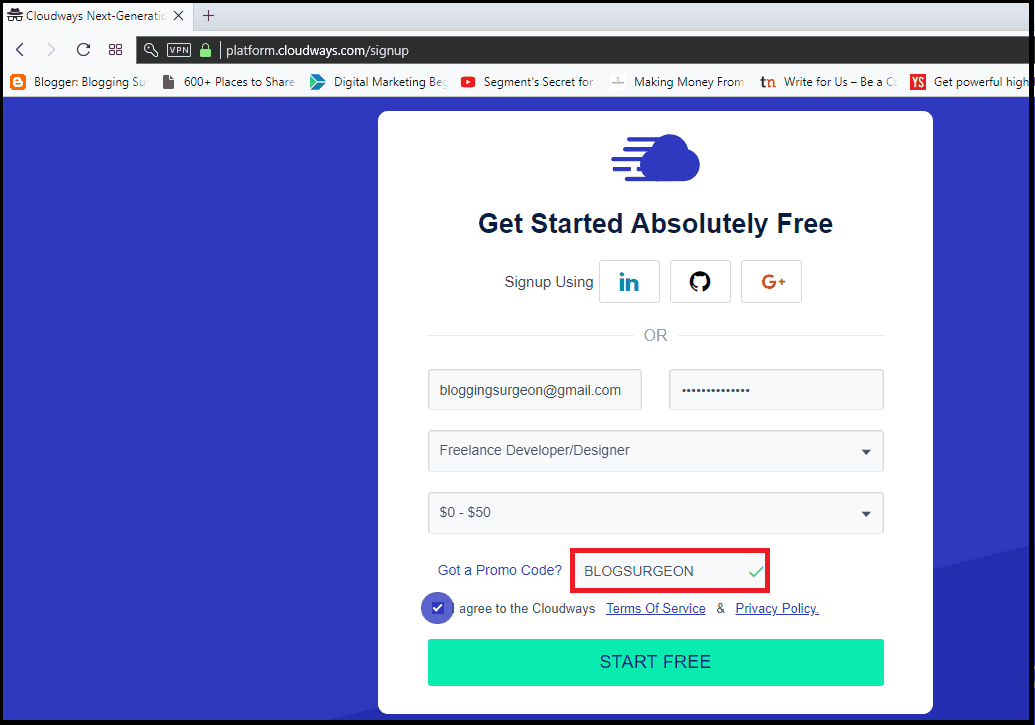
Step 1:- Sign up at your web hosting provider's website. For e.g. At Cloudways the Sign up form looks something like this
Step 2:- Once you sign up and verify your number and Email with them, you will be taken to Cloudways dashboard.
(Their mobile verification is bit slow and can take 3-5 minutes in extreme cases. If it takes more time for you, you can shoot their live support a message and they will solve the issue)
At Cloudways Dashboard, you will encounter with a message like this:-
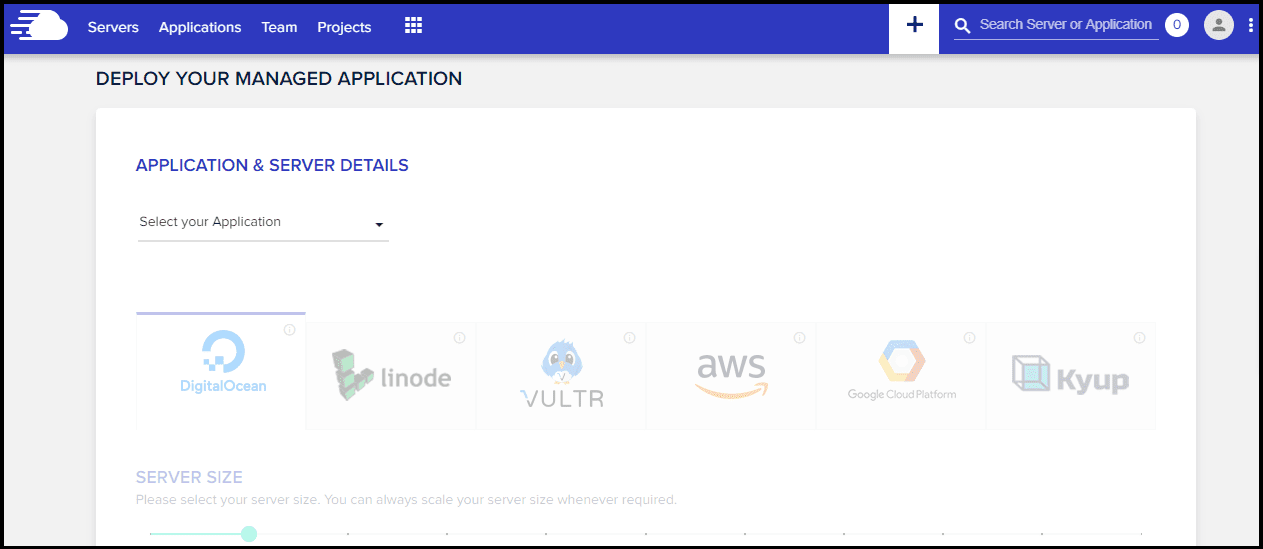
You need to select an application from Select your application option. As we are going through Tutorial of making a Wordpress website, we will surely select Wordpress as the application.
But.. You will see that there are four options under Wordpress even.
 |
| Making a Wordpress website- Step 1 |
Step 2:- Once you sign up and verify your number and Email with them, you will be taken to Cloudways dashboard.
(Their mobile verification is bit slow and can take 3-5 minutes in extreme cases. If it takes more time for you, you can shoot their live support a message and they will solve the issue)
At Cloudways Dashboard, you will encounter with a message like this:-
 |
| Making a Wordpress Website-Step 2 |
You need to select an application from Select your application option. As we are going through Tutorial of making a Wordpress website, we will surely select Wordpress as the application.
But.. You will see that there are four options under Wordpress even.
- Wordpress version 4.9.5
- Wordpress version with Woocommerce version
- Multisite version 4.9.5
- Clean (No Cloudways Optimization) Version 4.9.5
So Now Let us first understand these four options one by one:-
Wordpress version 4.9.5 is the latest version of Wordpress available to install. It is optimized by Cloudways team as a plugin named Breeze Cache plugin which is developed by Cloudways team itself is associated with it already.
If you are planning to start a Blog or a normal website, then you need to select this option of Wordpress version 4.9.5
Wordpress version with Woocommerce version is the second option and is suitable for those buddies who are planning to make a Woocommerce based store with Wordpress.
Do note that even if you install Wordpress version 4.9.5, you can install Woocommerce plugin at it. The only benefit you get if you select Wordpress version with Woocommerce option is that if you use the second option you will get full benefit of varnish cache.
This is why Cloudways recommends you to select the second option only if you want to make a woocommerce store.
Hence, second option of Wordpress version with Woocommerce is for those who want to make a Woocommerce website.
Then comes the third option of Multisite version 4.9.5. This also comes with Breeze plugin and is optimized. This Multisite version is beneficial for those who want to make multiple sites in future.
You can make multiple websites at same Wordpress installation which makes things easier for you.
Do note, Even at the first option (Wordpress version 4.9.5) you can get the multi site option.
Last option is about Clean (No Cloudways Optimization) Version 4.9.5. It is just similar to option 1.
The only difference is there are no prior optimizations like Installation of Cloudays Breeze Plugin.
Recommended :-
It is recommended to choose the very first option if you are planning to launch a Blog or a normal website and if its a woocommerce based store, second option is best.
Step 3:- After choosing your application, you need to name your managed server, name your managed app and then name your project.
You can give them any name as it does not show anywhere on your website and the option is made available just for the sake of categorization which is useful for freelancers and web developers who design a lot of projects.
After filling all these details, they will ask you to choose your cloud host. There are a total of six options. Digital Ocean is cheapest of them all and is good as well.
Hence, You can select Digital Ocean there. After that they will ask you to select server size. You can keep it 1 GB for now. (Later you can upgrade anytime as per your requirements)
Next thing is to select server location. You need to select the Server location in such a way that it remains near to your target visitors.
Suppose, I am targeting Indian audience. Hence I will select Bangalore location for the data center. After that click now on Launch now button and your server will be launched.
Step 4:- It takes 5-10 minutes to add server.
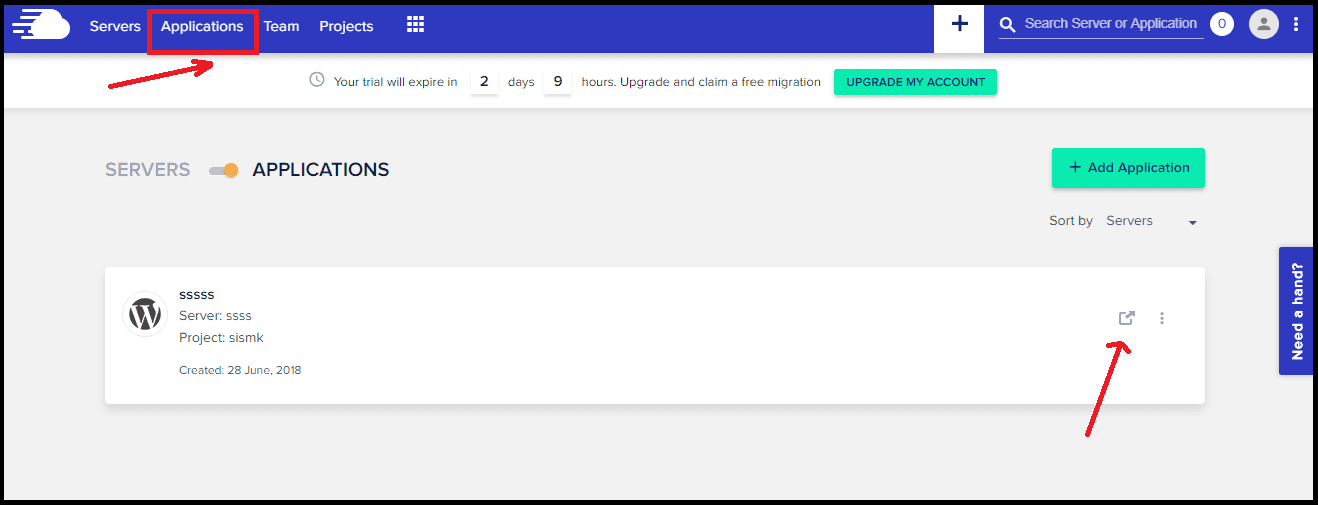
Once they finish doing it, you need to click on the Applications option at top of your Dashboard and then you can open your Wordpress website by clicking on the open link icon.
This will open up your wordpress website. (Refer to the below image)
By Default, Cloudways will associate a Staging url to your website. For e.g. In my case, it looks something like this:- http://wordpress-184652-543394.cloudwaysapps.com
You need to connect your registered domain name with your wordpress website and replace this staging url with your Domain name. In order to do that, you need to follow step 5.
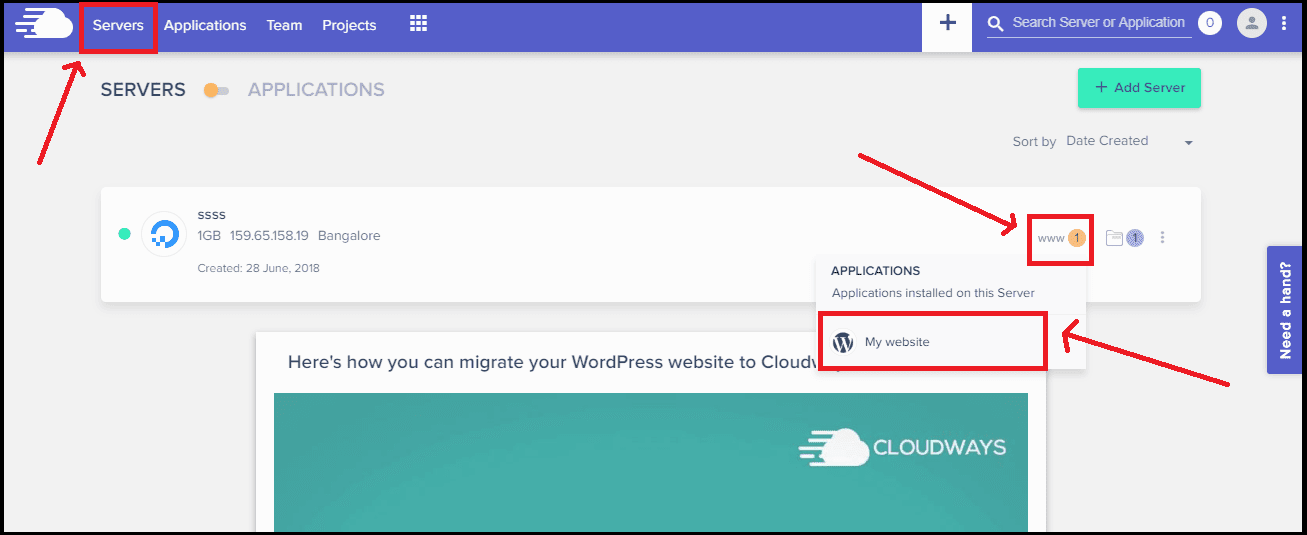
Step 5:- Go to servers option in your Cloudways Dashboard. There click on the www option and then select the Installed Wordpress application. (For details refer to below Image)
Once they finish doing it, you need to click on the Applications option at top of your Dashboard and then you can open your Wordpress website by clicking on the open link icon.
This will open up your wordpress website. (Refer to the below image)
 |
| Making A Wordpress Website- The Easy Way- Step 4 |
By Default, Cloudways will associate a Staging url to your website. For e.g. In my case, it looks something like this:- http://wordpress-184652-543394.cloudwaysapps.com
You need to connect your registered domain name with your wordpress website and replace this staging url with your Domain name. In order to do that, you need to follow step 5.
Step 5:- Go to servers option in your Cloudways Dashboard. There click on the www option and then select the Installed Wordpress application. (For details refer to below Image)
 |
| Making a Wordpress Website- Step 5 |
Step 6:- Step 5 will open up all the details of your wordpress website. In order to connect your Domain name, first go to Domain Management option under Application Management and add your registered domain name under Primary Domain and click on save changes. (Refer to the below image)
After saving changes, you need to go back to Servers options of your Cloudways Dashboard.
After it you need to Log in to your Domain registrar's account, click on manage DNS option there and add a single A record pointing to your Public IP.
This public IP can be found in your wordpress dashboard where servers option is there. It is written with your Data center's location.
DNS propagation takes some 24 hours so after completing the above steps your website will be ready as you will have successfully connected your domain name and your Wordpress website.
(Do note, the process of installing wordpress and later connecting domain will be bit different with every hosting provider but everytime your major target will be to install Wordpress and then later connect domain.)
The website you will create this way will be having default wordpress theme installed and will need a lot of other optimizations.
You need a better theme as per your needs, some good plugins installed and you need to do some other tweaks for giving it better looks.
Here Below I have provided some actionable tips which you can follow after making your new Wordpress website.
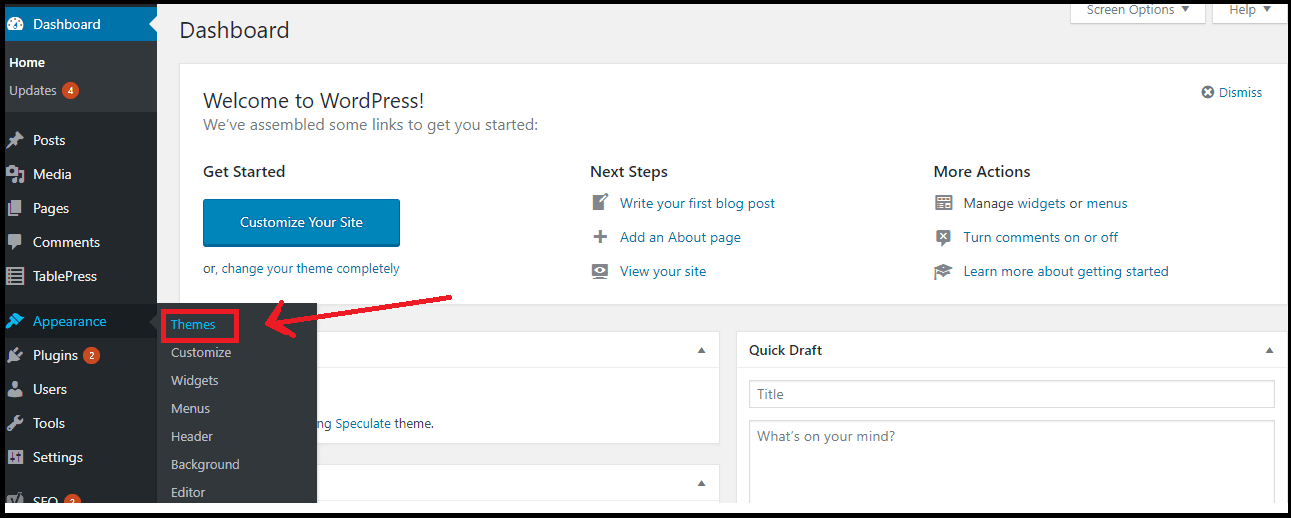
1. Install a Better Theme:- In order to install a Theme, you can login to your Wordpress dashboard and there in the Appearance section, you need to go to Themes option. (Refer to the below Image)
After clicking on themes option, A new page will open up where at the Top there will be an option to add new themes.
Basically I suggest you to use Generate Press theme. It is easy to customize and is a SEO friendly light weight theme.
You can download it here: Download GeneratePress theme for Wordpress
2. Install Plugins:- Plugins are there to add extra featured and functionalities to a Wordpress website.
Though it is recommended that you do not use too much wordpress plugins as they effect your page speed and can even cause security issues sometimes but there are some plugins which are very useful.
So you can install them and make them active. In order to install a Plugin,you need to visit Plugins option under your Wordpress dashboard and click on Add new Option.
There you can find new plugins and install them. After installing a plugin you need to click on Activate button to make the plugin active.
Here are my top most set of recommended plugins:-
 |
| Making a Wordpress website- Step 6 |
After saving changes, you need to go back to Servers options of your Cloudways Dashboard.
After it you need to Log in to your Domain registrar's account, click on manage DNS option there and add a single A record pointing to your Public IP.
This public IP can be found in your wordpress dashboard where servers option is there. It is written with your Data center's location.
DNS propagation takes some 24 hours so after completing the above steps your website will be ready as you will have successfully connected your domain name and your Wordpress website.
(Do note, the process of installing wordpress and later connecting domain will be bit different with every hosting provider but everytime your major target will be to install Wordpress and then later connect domain.)
The website you will create this way will be having default wordpress theme installed and will need a lot of other optimizations.
You need a better theme as per your needs, some good plugins installed and you need to do some other tweaks for giving it better looks.
Here Below I have provided some actionable tips which you can follow after making your new Wordpress website.
3 Things You Need To Do After Making A New Wordpress Website:-
1. Install a Better Theme:- In order to install a Theme, you can login to your Wordpress dashboard and there in the Appearance section, you need to go to Themes option. (Refer to the below Image)
 |
| Installing Theme at New Wordpress Website |
After clicking on themes option, A new page will open up where at the Top there will be an option to add new themes.
Basically I suggest you to use Generate Press theme. It is easy to customize and is a SEO friendly light weight theme.
You can download it here: Download GeneratePress theme for Wordpress
2. Install Plugins:- Plugins are there to add extra featured and functionalities to a Wordpress website.
Though it is recommended that you do not use too much wordpress plugins as they effect your page speed and can even cause security issues sometimes but there are some plugins which are very useful.
So you can install them and make them active. In order to install a Plugin,you need to visit Plugins option under your Wordpress dashboard and click on Add new Option.
There you can find new plugins and install them. After installing a plugin you need to click on Activate button to make the plugin active.
Here are my top most set of recommended plugins:-
- Updraft Plus- You can use it to save backups. Backups are especially useful for newbies. This is because if ever in some condition they do some technical mistake or somehow they made some random error, they can make use of backups and restore things.
- WP Super Cache- As the name suggests it is a cache plugin. You can install it and enable caching.
- WP Smush- It is a wordpress plugin used to optimize images. Optimization of images means it will decrease size of images but without effecting the quality of image.
- Askimet- This is an anti spam plugin used to stop spam on your website.
- Sucuri- It is a security plugin which you can use to make your website safe.
- Yoast SEO- It is very useful wordpress plugin especially for Bloggers as it helps you to maintain and do good on page SEO of your articles and content
3. Get a Google Analytics account:- Google Analytics is a free service which is useful for Bloggers and website owners.
You can use it to count number of visitors your website is getting, check the source of visitors (like from where they coming at your website) and other useful insights.
You need to place the Google Analytics tracking code in your website in order to start tracking. There is a plugin named Google Analytics by Monster Insights.
You can use it to place the tracking code of Google analytics at your new Wordpress website or even you can place the code directly in theme.
Apart from all this you can submit your website to Google for Indexing, connect your social handles with this website and do much more.
Just starting playing with Wordpress and you will learn a lot. Do not forget to share this tutorial if you liked it.
You can subscribe to us for reading more such awesome write ups.


")

 Blog")